Saturday, April 7, 2012

Reversed Vinyl (Shadowed) lettering
Recently I was asked to do a School sign which would adhere to the inside of their front windows.
I searched to find any tutorial for Reversing Letters for Vinyl adhesive but was unsuccessful in finding anything listed on You Tube or the Cricut web site. After speaking with a Cricut rep on How To proceed with using my Cricut expressions machine and their Vinyl adhesive and receiving a negative answer to such a tutorial on Reverse Lettering, I decided to make a video reference for anyone wanting to work with vinyl adhesive for the inside of a car or building window. Here is my tips and tricks. If you have succeeded in doing this, please comment on this blog as to any tips or tricks you might have learnt. Thank you.....Blessings
 |
The lettering was to fit in a 36" window panel. I used a 12 X 24" Cricut mat, placed the Shadow Colour adhesive vinyl sheet and using the free program download "Craftroom" from Cricut.com I choose the text box and typed the word Chedoke (School name). Then because it was a 24" word I chose the Flip horizontal tab and the reversed word looked like the above photo. HINT if your letter is 12" or less you could use the Flip vertically tab to reverse the word.
|
 |
The second word was equally long therefore I flipped it horizontally also. I removed all the excess vinyl,
exposing the lettering as you see them here. I removed the project (with the backing paper) from the 12X24 mat.
I then placed the transfer (red lined) paper on top of the exposed (Non-Sticky side) vinyl as per instructions inside packaging and burnished the transfer paper to the lettering. The transfer paper is rather sticky when the backing is removed - I removed its backing paper only a small portion at a time, lining up the corner and top edge with the corner and top edge of the vinyl letter backing. Move slow and steady and things will go great.
Proceed with the burnishing process as per instructions.
|
 |
The letters which were to be placed onto the red shadow welded letters were not welded and as you see here they were also Flipped horizontally on the 12 X 24" mat.. This helped to line up the individual letters on the red shadow welded letters.
|
 |
I cut out the individual letters. Using the backing and Non-adhesive side of the vinyl it was easy to
trim a small margin around each letter.
|
 |
Here you can see how close I trimmed the lettering. I then flipped over the shadow letters, peeled back the White (No Red lines) backing and centred the individual letters non-adhesive side down onto the red adhesive shadow lettering and peeled off the trimmed white waxy back paper exposing the adhesive side of the black letters. This precess left the red (Shadow letters) adhesive and the black (individual letters) adhesive facing up. I then recovered the whole project with the peeled back White (no red lines) backing and the wording was now ready to be transported fearlessly and later adhered in place to the school's inside windows using the same method as described on the instruction sheet inside the vinyl packaging.
The You Tube video link explains the process also. |
Friday, March 2, 2012
Easy Fold Corner Bookmark Video
 |
| Below is the video How To. Hope this helps with details. Leave a comment and maybe a photo of your finished bookmark. Enjoy! Blessings on your day!! |
Fast, Easy Corner Bookmark Thank you cards.
Good Morning Bloggers - here is another idea I came across while watching you tube videos. - There 's everything on there!!
I liked this idea because by forming a series of easy 1,2,3, folds you will turn a square piece of patterned paper into a corner bookmark. I have made a video and will upload that (via You Tube) after posting these photos.
I did 40 of these for our church ladies group for invitations to their monthly meeting with the added bonus of having the bookmark s a little gift from me.
Leave me a comment, your photos of finished bookmarks or questions. Have fun creating!!
Blessings on your day!
I liked this idea because by forming a series of easy 1,2,3, folds you will turn a square piece of patterned paper into a corner bookmark. I have made a video and will upload that (via You Tube) after posting these photos.
I did 40 of these for our church ladies group for invitations to their monthly meeting with the added bonus of having the bookmark s a little gift from me.
Leave me a comment, your photos of finished bookmarks or questions. Have fun creating!!
Blessings on your day!
 |
| Here is the finished corner without embellishments. Start by folding a square of paper (6X6) desired Patterned side down. Fold 1) Bottom to top and 2) Right to left. 3) open all folds. 4) fold a diagonal fold (Top, right hand corner) in towards the centre (where all fold score lines meet) 5) Fold over the right side of the patterned paper to the left (you now have a rectangle with the one diagonal fold at the top front). 6) Fold the bottom left hand corner (both piece of rectangle) up toward the outside edge, along the bottom edge of first diagonal fold. 7) Fold the bottom diagonal fold up over the top (#4) diagonal fold and tuck it INTO the top diagonal fold and you should have something like what you see above. |
 |
| I used a digital freebie from Gina K printed on Card Stock via my printer. Using the Cricut cartridge from Close To My Heart, I chose the straight oval at 2" and scalloped oval 2.25", then I adhered those two together and adhered that unto the folded portion of the Bookmark. This will allow the top portion of the oval to extend above your book pages. |
 |
| Using a 3.50" square of cardstock , I stamped my image first then using Martha Stewart corner punch, I punched out 3 sides of the square. I Positioned the bookmark unto the stamped square and Flipped it over. Using the edges of the bookmark as a guide - I adhered adhesive to the side and bottom edge that are exposed. (If you adhere the other sides you will not be able to slide your bookmark off the square). Place the stamped square with the bookmark in place to the front of your card. |
 |
| Here I added a little bling to the centre of my daisy/butterfly stamped image. This is one I did for my CTMH rep. Audrey Cando as a thank you. I added another step by adding little dots to each oval scallop using a opaque white glaze pen . I coloured this little scrapper stamp ScrapFest gave as a Freebie in Oshawa 2010. with Premium Pencils outlining the image first then shaded in the outlined areas using mineral spirits to pull the colour from the outlined edges. |
 | ||
| Here is what the Corner Bookmark looks like when in use! Audrey's info is showing but I am sure she won't mind - if you'd like any Close To My Heart products - she is very helpful and courteous. Click this link to view my Corner Bookmark Video
|

Friday, February 17, 2012
CTMH Scrapbooking layout
Good Morning! I hope the sun is shinning wherever you are today. This is what I have been working on when I can steal some spare time! The captions below the photos gives more detail. Blessings!
 |
| The cards and scrapbook layouts below are all done with the Winterland kit purchased from a Close To My Heart rep. Audrey Cando. |
 |
| The mittens, snowflakes and wording are stamps from the same kit I've cut the dimensions from the card and page maps given in the pamphlet that comes with the kit. |
 |
| The rhinestones in the middle of the snowflakes are also part of the kit. |
 |
| These embellishments can be purchased separately if you wish as well as the stamp set and rhinestones. |
 |
| The two pins can also be purchased separately. |
 |
| There is usually lots of left overs after finishing the page maps for the cards and pages. Here I experimented with another stamp sentiment and played with the butterfly addition. |
 |
| I chose not to use the butterfly and went with the snowflakes and rhinestones. This could be a great "Guys"card. |
 |
| Here is one of the finished 2 page layout included (with measurements for cutting) as part of the Winterland kit. |
 |
| The cups are part of the stamp set. You can layer them for a unique design. The solid cup in a light colour stamped first and the worded cup stamped on top in a darker colour. Close To My Heart stamps are acrylic stamps making them easier for placement the than wood mounted stamps. |
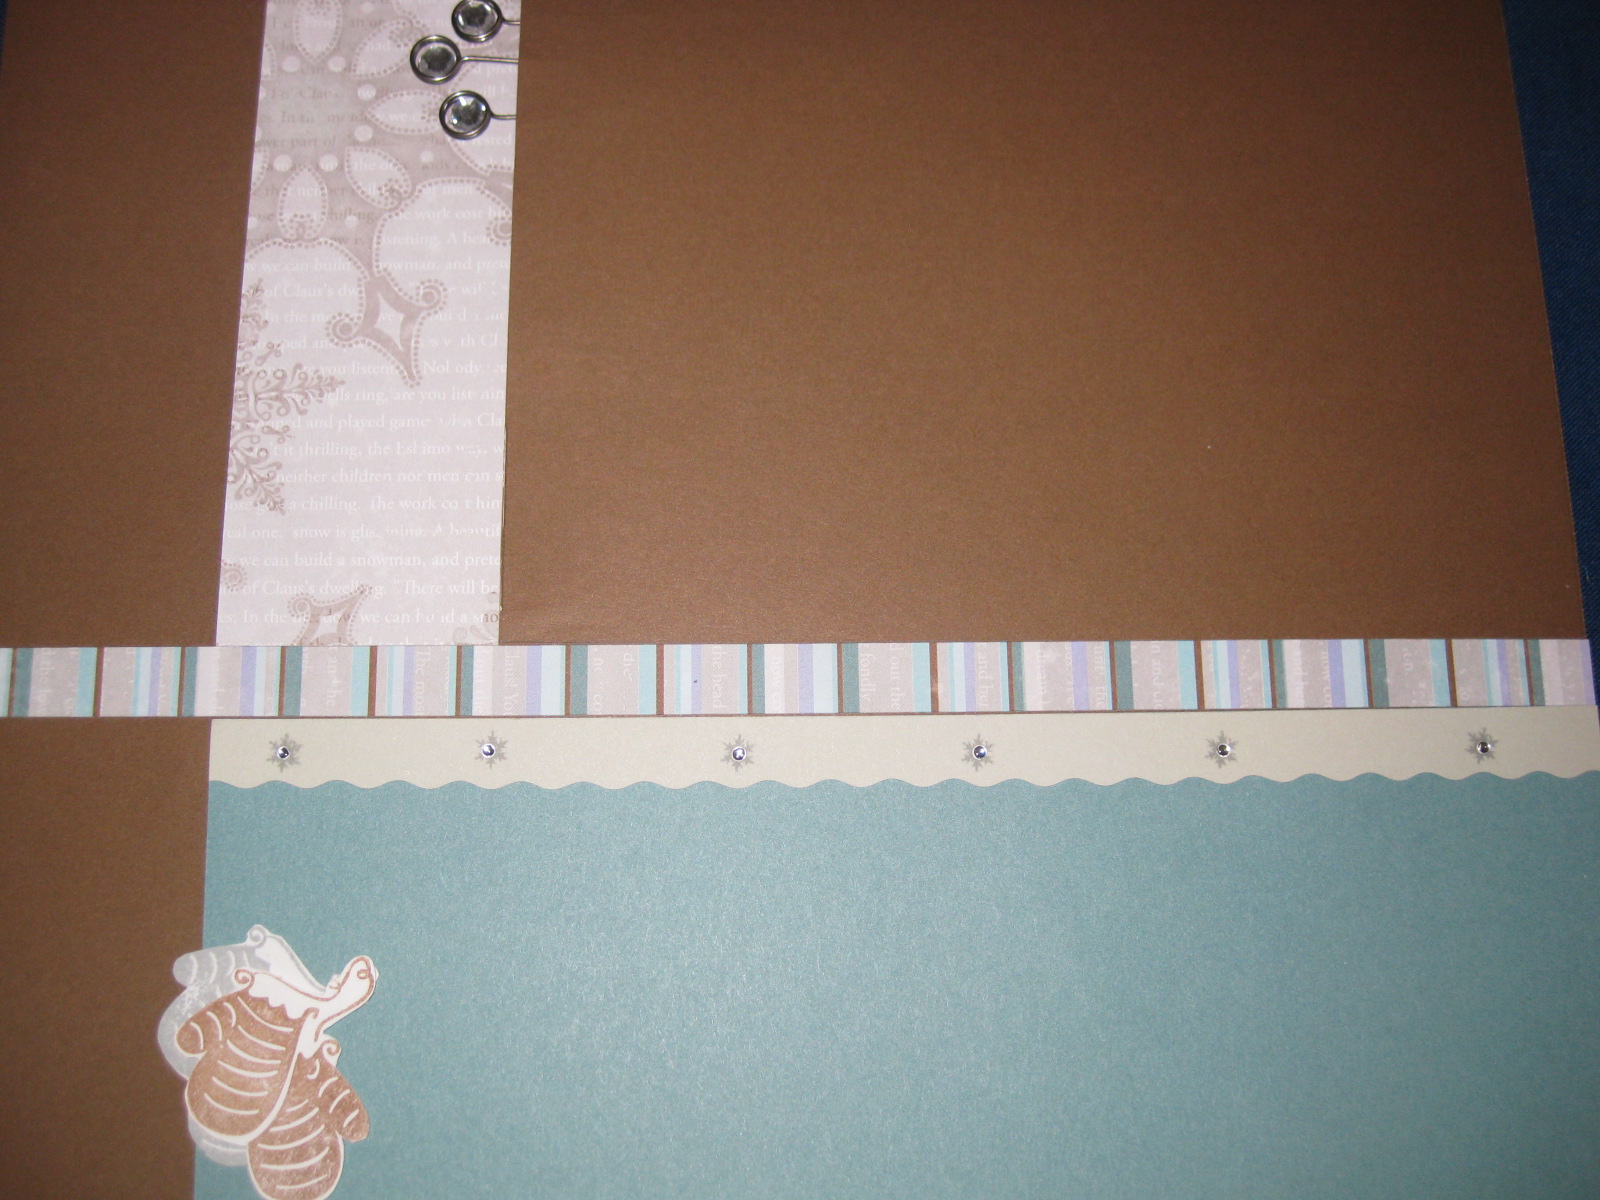 |
| Mittens are stamped and cut out. I did a grey pair behind and added a brown pair on top using dimensionals. |
 |
| The 3 pins at the top have larger rhinestones in the middle to accent them. They lie behind the brown panel attached with glue dots. |
 |
| The tiny snowflake stamp (also part of the stamp set) have tiny rhinestones as centres to accent them. The scalloped edge grey paper strip is cut using a scalloped edge blade insert for straight edge cutting systems. |
 |
| Here is the second of the finished 2 page layout included (with measurements for cutting) as part of the Winterland kit. |
 |
| You could use the white areas to place 2 photos or place one photo and use the other as a journal box or stamp/sticker something like "Let it Snow". I will make my choice when I choose my photo. |
 |
| I stamped the snow flakes (2 sizes/patterns) and added rhinestones. I love 'sparkle' |
 |
| Top right hand corner brown pattern paper embellishment was made with accordion folds using a ScorPal (scored every 1/2" before folding). I cut one half of the V first the folded it over as a guide to complete the cut edge to form a ribbon cut effect. The ends of the pins are not sharp enough to go thru the paper so I used a paper piercing tool to make the holes before inserting the pins. |
 |
| The bottom left hand side of the page has a grey 1/2" strip layer by the smaller blue strip of patterned paper using adhesive on the back of each strip. The pins are tucked in and rhinestones added to their centers. |
Leave a comment and/or send me the photos of your finished pages or cards using your choice of patterned paper. If you need the measurements for pre-cutting your pages before assembling them - email me (d.stevenson@rogers.com) and I will send them to you. Blessings on your day!!
Friday, February 10, 2012
Creativedscrafter Butterfly glitter sticker video
Here is the link to my You Tube video for the Butterfly glitter sticker ... it took forever to upload so I pray it works...
http://www.youtube.com/watch?v=FVPvavugHLI&list=FLEDI4gXQJZAbTyrepRSwTJg&index=1&feature=plpp_video
http://www.youtube.com/watch?v=FVPvavugHLI&list=FLEDI4gXQJZAbTyrepRSwTJg&index=1&feature=plpp_video
Butter Sticker post photos and instructions
Good Morning fellow crafters!! Here are the photos and above is the video of a pretty little butterfly sticker package that I picked up at Walmart for $1.88. I coloured in the Butterfly using alcoholic based markers (Bic). You can use Sharpies or Copics if you have them. Let me know what you think of this my first video!! Yeah... Blessings.....
 |
| This is the front of the butterfly sticker |
 |
| Here is the back of the sticker either way back or front both are beautiful. The You Tube video ilk is at the top of my blog... Enjoy! |
Subscribe to:
Posts (Atom)
Thank you for dropping by.

I trust you enjoyed viewing what I have been up to lately....Have a Blessed day!