Thursday, October 24, 2013
Wednesday, October 23, 2013
Monday, October 7, 2013
Wedding Design using Memory Box dies
I love the delicate design dies made by Memory Box.
This particular die below is named 'Cherished'.
These dies are approx 5 1/2" long and they vary in width.
I used it on a card I was creating for a wedding I recently attended.
 |
| I cut the original border in white to confirm the design and its dimensions. |
 |
This photo shows the back of the Cherished die cut from Purple card stock and a
dhered with double sided tape along the edge of a white frame made from Spellbinders scalloped oval dies.
I cut the white card stock frame by combining two scalloped dies, one1/4" smaller than the other.
I then place pop dots to the back of the frame to raise that edge to make a dimensional look to the card.
 |
Using the solid cut out from the second scalloped die, I placed a stamp "Our your wedding day"and a bride and groom sticker which I coloured in with alcoholic markers to add definition to the sticker. I first used the frame to help place the insert scalloped die cut to the card base before adhering it with double sided tape. The frame was then put in place with the Cherished die design enhancement resembling an overlay. I love how the embossing on the frame caused a tiny outline allowing the purple are stock base to show through.
 |
| I embellished the edges of the frame with tiny pearls and added heart stickers to the stamped title as well as to the right of the framed edge. |
 |
I later added a lace bow to the left outer edge of the scalloped frame. I felt it needed that
extra touch. I am sorry I do not have a photo for you, I had the enveloped
sealed before realizing I had not taken a final photo.
|
Book Mark card using Our Daily Bread stamps.
This is a card I made for a ODBD challenge using their stamp set. I wanted to make something useful as well as something that could be sent to a friend needing a little encouragement.
 |
| The card is a 5X7" brown card stock base with the cream card stock measuring 41/2 X 6 1/2". I coloured the stamp with Premium pencils, added the gold trim brown ribbon, then stamped the Faith wording below the ribbon with a Memento black ink pad. The slit for the bookmark was made at the top and the bottom of the brown ribbon which hides nicely when the bookmark is removed. I stamped the same greeting under the bookmark so when it is removed the card still contains the words of encouragement. The book Mark background is 2" X 6" and the cream overlay measures 1 1/2" X 5 1/2". I stamped only a corner of the butterfly stamp to enhance the bookmark, giving it a little colour . |
 |
| After slipping the bookmark in place I added the little bow as an added embellishment to give a finished touch. I hope this inspires you to create your bookmark keepsake for someone special. Blessings! |
Sunday, June 16, 2013
Decorative 5x7" card using Martha Stewart's 2 in 1 Butterfly punch
I thought you might enjoy this tutorial to make this 5x7" all occasion card.
Saturday, June 15, 2013
EK Border Punch 5x7" card
Decorative border and Spellbinders Resplendent Rectangle Dies
are two featured elements on this card.
Friday, June 14, 2013
Here's an idea for a larger 8 1/2x11" card
I really enjoyed making this huge card. It gives lots of space for several people to write their comments to the person receiving it. The actual card stock measured 11x17" scored and folded to form 8 1/2x11"
Wednesday, June 12, 2013
Creative cards to inspire your creativity
 |
Card size 5X 7 White card stock base
Design Paper from Michaels 12 x 12 open stock
Spellbinders die: Decorative Labels 8
Stamp: Close To My Heart D1308 "Treasured Life"
Butterfly Punch: Martha Stewart (2 in 1) punch
Clear Glitter pen(enhancing scrolled paper pattern), Ribbon and pearl embellishments.
|
 |
The embellishments for this 8 1'2" x 11" card pictured below are as follows: Pearl tipped stick pins: with beads glued into place with Glossy Accents and added to double Bowed ribbon. The string on Mini Pearls were attached to the outlined (inked) cut out from design card stockusing Glossy Accents ( I found the glossy accent product was faster drying than other adhesives). I glued a 2" to 3"section in place at a time. This helped with tight corners or small curved lines.). Spellbinders (larger die) "Resplendent Rectangles" and (smaller die) "Decorative labels 8" edges were inked using CTMH Twilight and a sponge applicator. The Stamp greeting is from CTMH "D1452 Find Your Style".
|
 |
This huge 8 1/2 X 11 Card was from 11"X 17" card stock. The details re tools used for this card are listed above with the exception of the bottom scroll Border from EK punches. This punch can be purchased at JoAnn Fabrics, AC Moore or Michaels.
|
 |
Card size 5X7. Base yellow card stock back and border side measured 6 3/4" Scored and folded at 1 3/4" after the EK border punch was used to form the decorative side border. The design Card stock was from DCWV "Pocket full of Posies" Matstock. The Martha Steward butterfly punches were covered with Stickles and after they dried, the edges were sponged with CTMH Twilight ink pad. The label was from the Spellbinders "Decorative Labels 8" dies the edges were inked with the same products as the butterflies. The "Cute as a Cupcake" and tiny bow stamps were from the CTMH 'Paper Doll D1547' set.
|
 |
Card size 5 1/2 X 5 1/2" using White Card stock. The embossed 3 panels were cut at 1 1/2" wide x 5"long. The outside 2 panels were glued in place before the centre panel to allow balanced spacing. The 3 daisies were punched with a Marvy (larger) and a recollections (smaller) daisy punch. The larger daisy has 2 rows of petals (one formed with pedals facing down and the 2nd layer petals curved in different directions with the use of a scoring bone. The centre small daisy was cupped by pushing into the centre of the daisy with a large stylus, then embellished with a rhinestone. Each daisy was glued in place at the end of each (ribbon cut) shaped panel. The anniversary stamp was found at a local dollar store. It was stamped on white car stock, then cut out with fine pointed scissors and placed in position with pop dots.
|
Monday, May 13, 2013
Cards with glitter
I will add the instructions, including the die numbers from Spellbinders, to these cards in a day or two.  |
| The greeting here is from Daily Bread Designs The Decorative Oval is from Spellbinders The Butterfly and floral embellishments are Martha Stewart's |
 |
| The background decorative die and the layered decorative oval are both from the same Spellbinders die. There are actually 3 dies in this set. The third die not shown is a label die. |
 |
| These leaves cut from a Cricut cartridge and added silk floral buds as embellishments. Both the leaves and floral petals were enhanced with stickles. I added the black rhinestones for eye candy. This photos really picked up where the glitter was added. |
 |
| This card is will used for an upcoming wedding. The highlighted raised areas are inked with Memento. |
Saturday, April 20, 2013
New Card Designs you might enjoy
 |
| This is my Mom's Card for 2013 |
Material and Tools used –
Purple 8 ½” X1 1” card stock
is scored and folded at 5 ½” and cut at 7” to measure a 5 ½”
X 7” card base. The corners were rounded with a corner punch.
The decorative white card stock was cut using a Gypsy, Close
To My Heart Cricut cartridge and expressions 2 machine. Using the Gypsy and adjusting measurements I joined
the decorative outer edge with the inner oval.
The Mom embellishment is cut from the Cricut Mother’s Day
cartridge and further embellished with stickles.
The lilac flowers are cut using 2 tools 1) Heartfelt
Creations (5 petal posies ) and 2) Martha Stewart violet punch and the floral
vine punch (used as a background base).
The flowers are layered and retouched on the edges with Tim Holt’s Dusty
Purple distress ink pad. Mint green pearls were added to the centres to add a finished touch.
The bigger leaves are simply hand cut and ink embellished then
glued in place as a filler behind the posies.
The green bow is the pull string type ribbon bow glued in
place with Beacon’s glue. (I appreciate its grip on bow materials.) The final embellishment is a handmade jeweled
hat pin inserted behind the bow.
 |
| This is a Sympathy Card for a dear friend. The Card base is 5 X7" cut from 8 1/2" X 11" mauve card stock. The dry embossed folder is from Darice, the butterfly is from the new Martha Stewart collection (CHA 2013) with tiny pearls to accent the body and the stamp is one I purchased from Michael's craft store on sale (A great find at 4$). |
 |
| This was a play day card using the same new MS butterfly punch as the card above. The card's dark brown base measures 5 1/2" X 4" I used mauve on blue card stock for the butterfly and added some bling using stickles to coat the openings of the wings. The DMCV design paper mat is cut from the new Creative Cards cartridge from Cricut and glued unto the blue 5 1/8" X 3 3/4" background mat. The banner was cut from the same cartridge and is cut at 3" long X 1 3/4" wide the edges are inked using a Memento Coco brown ink pad. The thinking of you stamp is from Stampin' Up and embellished with a dark blue rhinestone. |
Thursday, April 4, 2013
New layout using Pemberley CTMH cardstock
 |
| This the right page of the double layout the circles are Large 9" scalloped cut at 1/3rd. The other 2/3rd is placed on the left page of the layout. The smaller one is a 5" scallop. The remaining straight circles are 1 @ 3" and 2 @ 3 1/4" 2@ 1 1/4". You can choose the colours of your choice but I used what you see in the photos posted. |
The word Sisters are cut out of the same colour as the scalloped (flower) circles.
They are cut at 1 1/2" using the font of your choice.
 |
| The flower embellishments are layered cuts from Circut scalloped circles and stamped with a flower stamp to make petals. They are cut from the same yellow card stock using the measurements below, DO NOT UNLOAD Paper between each cut (or shapes). For Large shape (flower) cut 3 @ 1 1/2" ; 2 @ 1 1/4" ; 3 @ 1" and 2 @ 3/4" . After stamping each flower with the same colour ink layer them in 3's (L,M,S). They are placed where you desire using a pop dot or as you choose. |
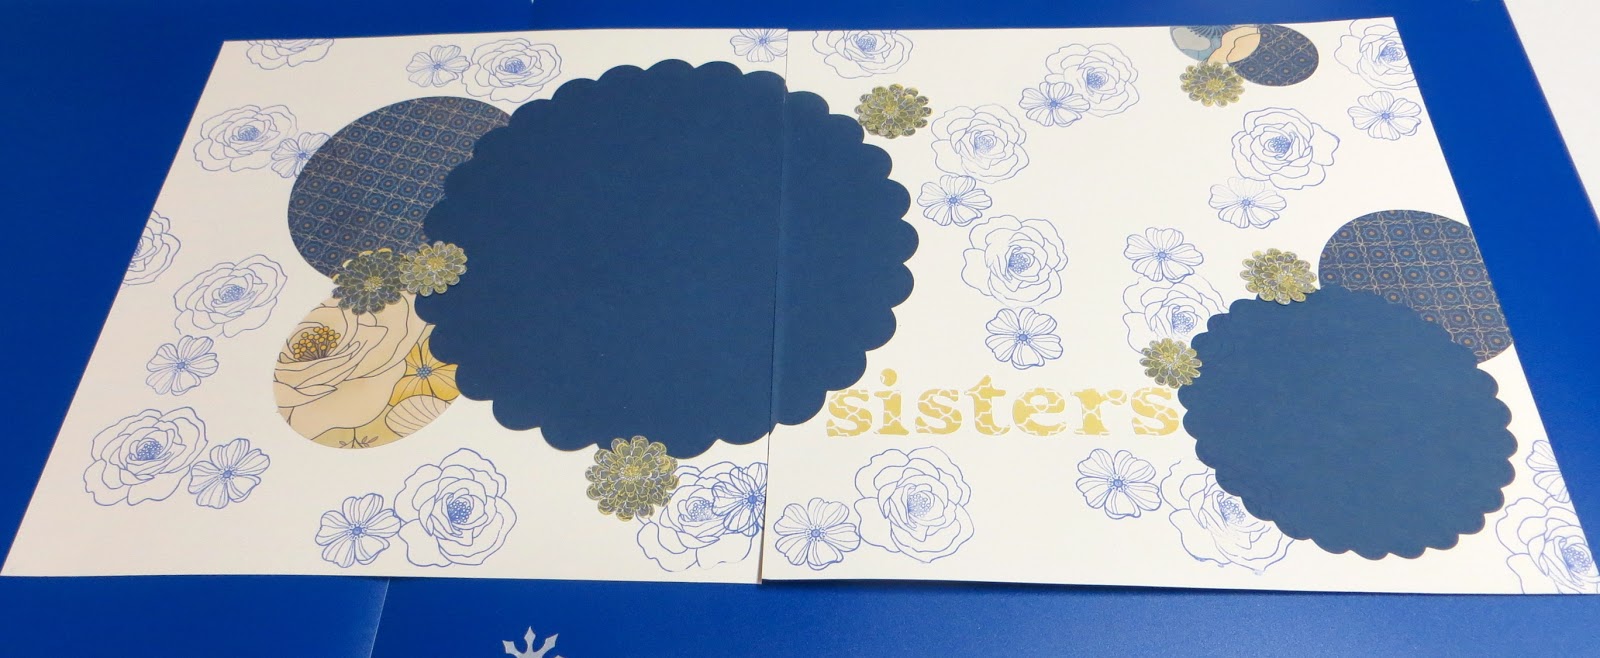 |
| Here is the completed double page layout when placed side by side. |
Tuesday, March 26, 2013
Card Folder Video This folder can hold 6 plus greeting cards plus their envelopes
For instructions and photos of the cards and their holders made using the instructions for this video please check out older blog post for December 2012. Blessings
Chantilly Scrapbook Layout from Close To My Heart workshop
For up to date available Close To My Heart scrapbooking and card making kits
visit my web site at www.dorothystevenson.ctmh.com


 |
| For this an other inspirations visit my Close To My Heart web site at www.dorothystevenson.ctmh.com The photo below was rotated by mistake the photo should be seen vertically, not horizontally as shown. The above photo is correct running horizontally. |
 |
| The rectangle measurements are as follows Solid Yellow CS cut 2 @ 3X5" and 2 @ 3X6" Patterned Yellow CS cut 2 @ 2X5" and 2 @ 2X6" Patterned Mint Green CS cut 1@ 5 1/2 X 12" and 1 @ 2 1/2 X 12" Patterned Pink CS cut 2 @ 1/2" X 12" and 1 @ 3X 12" The background CS is a light sand CS 12X12" |
 |
| These are the papers left over after completing the 6 page layouts. |
 |
| The stamp set gives much use for the patterned sections as background designs for flowers, etc. The scolloped edge in the pink paisley layout is made from the round stamp, stamped on white card stock and cut in half. The half circles with each of the title stamps (summer bliss, etc) are made in the same fashion. The accent floral buttons and floral chipboard accents are part of the embellishments from the Chantilly workshop. |
 |
| This is an example guide of the wheel used in the layout using the stamp set. You may choose your patterns and ink colours to suit your creativity. |
Subscribe to:
Posts (Atom)
Thank you for dropping by.
I trust you enjoyed viewing what I have been up to lately....Have a Blessed day!