Tuesday, December 18, 2012

Iris Folding instructions, video and photos

After you have created a few designs you will master the art of Iris folding.  It is as easy as folding 1" strips of thin paper, following clockwise (1,2,3) around a basic triangle, square or circle Pattern of fold lines. Here are some photos and instructions to get you started.  
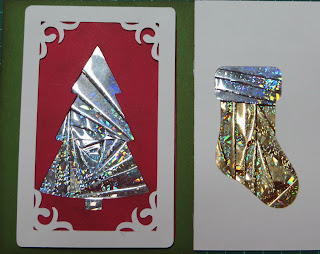
The tree and stocking in this photo was cut using the Cricut cartridge from Close To My Heart 2011.  
The foils used are from wrapping paper cut in 1" by 12" strips,   fold each strip  in half  
to form 1/2" X 12" long.  Wrapping paper works best due to bulk on the back (Folds) of the image.  
The tree design was placed on top of the triangle Iris pattern from the basic shapes found at  www.mykindofliving.com   The stocking was done freehand with no iris pattern.  (Update to mykindofliving web site - it is no longer existent - Please refer to www.circleofcrafters.com/irisfolding)  I just noticed this today while returning to the web site myself.  Thank you for your understanding.
This angel design was found at www.childrenlearningonline.net
click first on Be Creative then on Iris Angel
1. Place a cut out design on top of Iris folds pattern.  

2. Tape one side the card stock to the iris pattern to hold it in place until your project is completed. 
(This also allows you to check the front of your design without misplacement)
3. Using 4 different colours of wrapping paper for the four sides of the square iris pattern 
4.  working from the back of the design starting at number 1 or the shortest outside edge of the design (cut strips of folded paper slightly larger that the pattern and secure to the back of the cardstock using scotch tape
5. Follow the shape as it rotates around the pattern cutting lengths as needed and securing each length with tape.
6. Alternate the four colours working your way in toward the centre Iris to complete  your design.  
This angel and its instructions can be found on the web link at the top of the design.

Videos can also be found on the circle of crafters web site as well as on YouTube.com to help you with its creation.

 These basic patterns plus the oval and other basic shapes can be copied into a Word file or saved as a PDF file and then resized to meet your needs for designs of various sizes.  The downloads are located at www.mykingofloving.com under  Basics 
 
 The triangle pattern formed the ornament design while  the square Iris pattern formed the stocking.  Both designs were cut from the Close To My Heart cricut  cartridge.  My video and others can be found on youtube.   A copy of my video is embedded is this blog.
This teddy can be changed into a kitten by pointing the ears which are the starting folds 
at the top of the head, the second fold is the bottom right foot then moves up to the top left ear for number three 
then down to the left foot for number four.  Number 5 is found on the tip of the left foot extending that folded piece of paper to the tip of the left paw.  Continue following the numbered folds and the lengths securing each strip of paper in place with scotch tape until you reach the centre IRIS.  The iris can be a single piece of decorative paper, a rhinestone, a word (i.e.  name or title) or even a button.  Let your creativity be your guide.  

December YouTube Videos and Instructions


All occasion and Christmas cards.  Gift card holders

The images below correspond with the YouTube videos you should see to the right of my blog under Creative Crafter videos.  If you do not see them you can view them on your YouTube search .
These card holding folders are 3 of 6 created for a bazaar.
Some have ribbon closings and others left open.
The Card stock can be plain and embellished as you wish after completing
the completing the pocket holder.
Each folder is made from one 8 1/2 X 11" sheet of Card Stock.  The heavier weight CS works best
but standard 65 lb.  will do fine as well.
Using you score tools score (from top to bottom) on the 8 1/2" side at 3/4", 5 1/4", 5 3/4" and 10 1/4"
Flip CS to the 11" side and score (top to bottom) @ 2" and 2 1/4" .
To help not make mistakes Cut from the outside edge on each side to the 3/4" score line and from the 11" outside edge to the 2 1/4" line.  Now score your last (Pocket) lines on both edges the 11" side at 1/2".
Zoom in on the photo above to get a close up if this confuses you.
If you want a ribbon closure make a small slit in your side fold to feed your ribbon through.  apply adhesive (I use score tape for its strength) to the top 3/4" score lines first, fold with your scor bone tool (securing the ribbon ties).
Score the remainder of the score lines, apply adhesive and fold in place.
If you wish you can round the inside pocket edge to give a finished look.


 These are other card examples From 2 other folders. These make a great friend/teacher's gift for any occasion. I'd love to see a photo of your completed folder and cards when yours are completed.

 The Following are the dimensions for creating more than 15  cards from just 3 12X12 sheets of card stock. The instructions and the patterns below are taken from the Close To My Heart Christmas 2012 workshop.

Finished project
3 card sketch (layouts)
Here are the dimensions
1st. (upper left) From a solid colour cut 4 @ 5 1/2 X 4 1/4",
2nd (upper middle) From same solid colour cut 1 5 1/2"X 4 1/4" and 5 (strips) 5" X 1/2"
3rd (Upper right) 2nd solid colour choice Cut 5@ 3 3/4X2 1/2"; 5 @ 4 X 2 1/2"; 5 @ 5 1/2X 1 1/4"
Refer to the photo above to clarify.
4th (lower left) using cream colour (used for stamping purposes)  Cut 5 @ 3 X 2 1/1"
 and 10 @ 2 1/2X 2 1/2" (Square)
5th (lower middle) Design pattern paper. Cut 5 @ 3 3/4 X 2 1/2"
6th (lower right) 3rd solid colour Cut 5 @ 3 1/4 X 5" and 5 @ 4 1/4 X 1 1/4".

After finishing paper cuts, use the layout photo for placement or use your creativity to design  a new creation.


Friday, November 9, 2012

Close To My Heart Christmas Stamp set and chipboard Oranments

There is the You Tube video explaining the Close To My Heart chip board cuts and the embossing.   Leave me a comment or question and I will do my best to assist you as best I can.  I would love to hear from you.  You can follow my blog for further ideas and techniques.    Blessings

This is one of the 2012 Christmas stamp sets from Close To My Heart
The cutting details for use with the Artiste (CTMH) cartridge are placed beside 

each stamp on the plastic backing sheet.    
The Chipboard cut out below are a perfect addition to this stamp set


                     The Blue Blitz and Opaque Silver embossing powder is 
Michael's Reflections brand.


The Light Olive Pearl Green embossing powder below is also Reflections.

The Red Dragon Opaque and Jewel Opaque gold embossing powders are by Stampendous.Purchased at Michaels 
        
I love this Martha Stewart
Bow punch 
I punched out red, green, white and then embossed card stock scraps with glitter embossing powers then punched out some glitter bows as well.  The center of the bows above are accented with gold rhinestones and adhered to the glittered bows with Glossy accents.

Friday, October 26, 2012

CTMH Scrapbooking layout

As Promised .... Here are some of the Close To My Heart layouts I have enjoyed working on!

For current 2013/2014 available kits visit my web site at www.dorothystevenson.ctmh.com
 This Layout was from the Sanoma Workshop presented in 2011


 The richness of the Olive Green and the deep Plum colours really go well with the
stamped images and the tan backgrounds in the printed pages.


I loved this workshop so much I decided to continue with the 4th double page layout.


The Close To My Heart Cricut Cartridge was used to create the circle you see above


The following 3 double page layouts are from the Cruisin Workshop from the 2012 CTMH book


The bottle caps on the left are adhered with pop dots (layering 2 together and placed inside the cap).   I loved the stamp set that came with this workshop.  The vintage car and gas pump can be used for future masculine cards, etc. 


Here the car is stamped using red instead of the green one from the first and second layouts..


This is definitely a princess layout,  It was so much fun to do.  The crown is a rub on cut out and enhanced with tiny rhinestones.  All from the workshop supplies.


The Grey card stock is sanded with fine 0000 sand paper to give a distressed look. 
These photos show the layouts placed inside the album therefore you see a reflection on the pages. 


This is the latest Workshop (October) I worked on.  It was a delight to do. 
 I love the flowers and stamp set that came with this work shop.


I love these colours.  Coral, Aqua blue, milk chocolate...yummy.  The button centres are darling.


These flowers were from a paper flower packet that came with the work shop as well.

 
The banner above is made from burlap and has tiny pearls in between each triangle.

Thank you for dropping by.

Thank you for dropping by.
I trust you enjoyed viewing what I have been up to lately....Have a Blessed day!